Assignment Rules

 Assignment rules use to automate  organization’s lead generation and support processes(Case assignments).
  1. Lead Assignment RulesSpecify how leads are assigned to users or queues as they are created manually, captured from the web, or imported via the Data Import Wizard.It automatically assigns leads to users or queues based on criteria you define. You can create multiple rules with different conditions, but only one rule can be active at a time.
  2. Case Assignment RulesDetermine how cases are assigned to users or put into queues as they are created manually, using Web-to-Case, Email-to-Case, On-Demand Email-to-Case, the Self-Service portal, the Customer Portal, Outlook, or Lotus Notes. It automatically assigns cases to users or queues based on criteria you define. You can create multiple rules, but only one rule can be active at a time
  • if your organization uses record types, the assignment rules determine the record type when a case is created manually or imported without a specified record type. When no assignment rules apply, the record type of the case owner is used. When the default case owner is a queue, the queue owner's default record type is used.
  •  


    Relationship between Account and Contacts and Opportunities


    1. When we delete Account all related contacts and Opportunities get deleted and also when we  undelete then respective contacts and opportunities get undeleted
    2.  when we go to check on the field it shows lookup
    3. We can not create rollup summery fields for contacts on Account 
    4. We can create rollup summery fields for Opportunities and Entitlements on Account.


    Self-Service Portal???

    Starting with Spring ’12, the Self-Service portal isn’t available for new orgs. Existing orgs continue to have access to the Self-Service portal.

    Creating Custom Exceptions

    Since we can’t throw built-in Apex exceptions but can only catch them, we can create custom exceptions to throw in your methods. That way, we can also specify detailed error messages and have more custom error handling in  catch blocks.
    To create  custom exception class, extend the built-in Exception class and make sure your class name ends with the word Exception. Append extends Exception after your class declaration as follows.
    -------------------------------------------------

    public class MyException extends Exception {}

    ------------------------------
    public class Utility {
       
        public static void insertMethod() {
            try {
                
            } catch(DmlException e) {
               
                throw new MyException (
                    'my Custom exception message.', e);
            }
        }
    }

    Order of Execution for Visualforce Page Postback Requests

    postback request is made when user interaction requires a page update, such as when a user clicks on a Save button and triggers a save action. The following diagram shows how a Visualforce page interacts with a controller extension or a custom controller class during a postback request:

    1. During a postback request, the view state is decoded and used as the basis for updating the values on the page.
      Note
      A component with the immediate attribute set to true bypasses this phase of the request. In other words, the action executes, but no validation is performed on the inputs and no data changes on the page.
    2. After the view state is decoded, expressions are evaluated and set methods on the controller and any controller extensions, including set methods in controllers defined for custom components, are executed.
      These method calls do not update the data unless all methods are executed successfully. For example, if one of the methods updates a property and the update is not valid due to validation rules or an incorrect data type, the data is not updated and the page redisplays with the appropriate error messages.
    3. The action that triggered the postback request is executed. If that action completes successfully, the data is updated. If the postback request returns the user to the same page, the view state is updated.
      Note
      The action attribute on the <apex:page> component is not evaluated during a postback request. It is only evaluated during a get request.
    4. The resulting HTML is sent to the browser.
    If the postback request indicates a page redirect and the redirect is to a page that uses the same controller and a proper subset of controller extensions of the originating page, a postback request is executed for that page. Otherwise, a get request is executed for the page. If the postback request contains an <apex:form> component, only the ID query parameter on a postback request is returned.
    Tip
    You can use the setRedirect attribute on a pageReference to control whether a postback or get request is executed. If setRedirect is set to true, a get request is executed. Setting it to false does not ignore the restriction that a postback request will be executed if and only if the target uses the same controller and a proper subset of extensions. If setRedirect is set to false, and the target does not meet those requirements, a get request will be made.
    Once the user is redirected to another page, the view state and controller objects are deleted.

    For a specific example of a postback request, see Examples of Visualforce Page Execution Order.

    What is View State?

    Visualforce pages that contain a form component also contain an encrypted, hidden form field that encapsulates the view state of the page. This view state is automatically created, and as its name suggests, it holds the state of the page - state that includes the components, field values and controller state.
    Illustration:
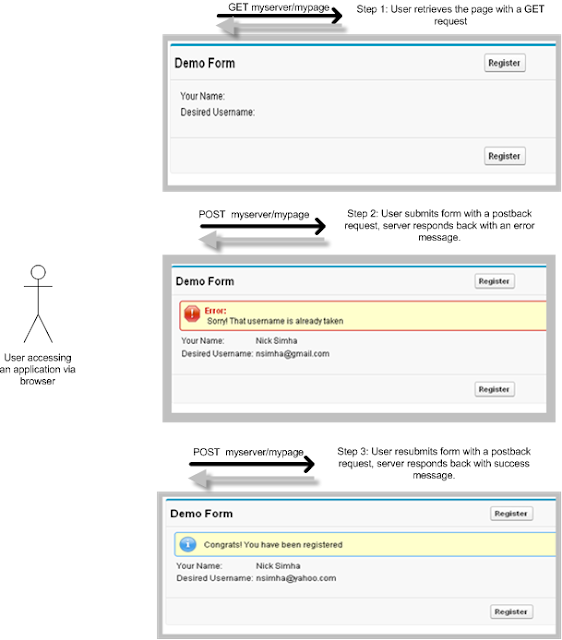
     A user requests a web page with a simple form on it, and fills out the form and submits it. If the user's input fails the validation rules for the form, the server responds with an error message - the user corrects the error and resubmits it successfully. Behind the scenes the browser is issuing HTTP requests.

    The page is initially retrieved with a GET request and form submissions happen via POST requests. These POST requests are also called postbacks since the data on the form is being posted back to the same page. From the user perspective, this is a stateful interaction since the page state is changing based on its previous state. However HTTP is a stateless protocol, which means that the initial GET and the two subsequent POSTs are treated as independent requests for the page. As a result, some other mechanism is needed to persist state information across HTTP requests.
    In Visualforce, page state is persisted as a hidden form field that is automatically inserted into a form when the page gets generated. We call this the view state of the page. The view state captures the state of the page -- state of its associated controllers and extensions and the component tree on the page. The view state is posted back along with the other form data, which gives the server enough information to recreate the page state to which new changes can be applied. Please consult this Order of Execution for Visualforce Page Postback Requests in Visualforce documentation to understand the order of execution for a Visualforce page.
    What is Contained in the View State?
    The data in the view state should be sufficient to recreate the state of the page when the postback is 
    received. 
    To do this, it stores the following data:
    • All non-transient data members in the associated controller (either standard or custom) and the controller extensions.
    • Objects that are reachable from a non-transient data member in a controller or controller extension.
    • The component tree* for that page, which represents the page's component structure and the associated state, which are the values applied to those components.
    • A small amount of data for Visualforce to do housekeeping.
    *Every component on vf page  has an entry in the component tree section of view state

    Best Practices for Optimizing View State:
    1.  Minimize Number of Forms on a Page
    2. Declare Variables as Transient to Reduce View State
    3. Recreate State versus Storing It in View State : "View state should ideally contain only work in progress data (the current object being edited, multi-page wizard data, etc.) If you can reconstruct the data during postback, via a SOQL query or a web services call, do that instead of storing it in controller data members."
    4. Use Custom Objects or Custom Settings to Store Large Quantities of Read-Only Data
    5. Refine Your SOQL to Retrieve Only the Data Needed by the Page
    6. Refactor Your Pages to Make Its View Stateless:     Instead of using apex:commandLink or apex:commandButton components (which need to be inside a apex:formcomponent) to invoke an action, use an apex:outputLink or other non-action method instead and implement the action through an apex:page action attribute - where it makes sense. The following code shows two ways to invoke a controller method called proccessData() - first with a commandLink, and then with an outputLink and auxiliary page.// On this page we use a commandLink to invoke a method. CommandLink should be inside a 
      // form and thus will have an associated view state
      <apex:page controller="ExampleController" >
       <b>Example with command link </b>
       <br/><br/>
       <apex:form >   
           <apex:commandLink value="Process Data" action="{!processData}"/>
       </apex:form>
      </apex:page>
      
      
      //This page accomplishes the same without the need for a view state
      <apex:page >
           <b> Example -  using outputLink </b>
           <br/> <br/>
           <apex:outputLink value="{!$Page.MyPage2}">Process Data</apex:outputLink>
      </apex:page>
      
      // On MyPage2 you can also invoke a method with an action attribute
      <apex:page controller="ExampleController" action="{!processData}">
      
      </apex:page>
      Consider Doing Your Own State Management in Certain Cases
      In certain cases, you may want to bypass the view state mechanism offered by Visualforce and do your own state management. In such cases, use a HTML FORM instead of apex:form. This technique is useful for dealing with Visualforce pages that may have to be served to mobile devices where the view state may be too large for the embedded browsers. https://help.salesforce.com/articleView?id=000323828&type=1&mode=1


    Blood Bank Management System


    Blood Bank Management  System
    This is a very simple module .
    Any one can run it by following these  steps .


    1.
    Download Apache Tomcat  and Install it in your Machine successfully.

    2.
    Download this BBMS.rar   file and extract it in your machine  successfully.

    3.Copy extracted BBMS folder and paste into this location C:\Program Files \Apache Software Foundation\Tomcat 6.0\webapps

    4.Download mysql setup and install it into your machine with user=root and password=root successfully

    5.
    Download Mysql administrator  and install it successfully.

    6. Open MySQL Administrator and  Login with following credentials.
     Stored location:= localhost
     Server host:=  localhost
    Username:=root
    password:=root 
        
    And click on Restore in sidebar
     7.
    Download this Database Backup file Restore this file backup with the help of MySql Administrator opened in Step 6 successfully.

    8.Do window search for Monitor Tomcat  run it as Administrator by right click on Monitor Tomcat.


    9.Open any  web-Browser paste This URL  http://localhost:8080/BBMS/


    10.Module is running now

    Counters